Authoring Guide
Where is the authoring tool?
The authoring tool can be found by clicking this link. You can also click the large "Authoring" button on the landing page, or select the "Authoring" button in the navigation bar at the top of any page on this site.
This is tough to understand through reading. Is there a video tutorial that I can watch somewhere?
A video tutorial on how to convert traditional HubNet models to work in HubNet Web can be found here. Exempting the first few minutes, nearly everything in the video is done in the HubNet Web authoring tool.
I have reached the authoring page, but I've been greeted by four buttons. What do they mean?
These buttons all lead you to the authoring tool, but from different starting points. These options will make more sense if we take a moment to go over how HubNet Web files are structured.
A fully operational HubNet Web model is a single .nlogox file. This format is compatible with NetLogo 7, desktop NetLogo, and NetLogo Web, and it bundles together the model code, widget layout, and HubNet Web configuration into one place. The two primary buttons at the top of the page work with this format.
Create a model from scratch: In this case, you have neither a HubNet Web configuration nor an existing model. You have to start from nothing, so the authoring tool will not attempt to load anything more for you than the basic skeleton of a HubNet Web activity.
Edit a NetLogo model (.nlogox): Here, you have a .nlogox (or older .nlogo) file. This option is for both creating a new HubNet Web configuration for an existing model and for editing a model that already has a HubNet Web configuration embedded in it. If you're starting from a desktop NetLogo, desktop HubNet, or NetLogo Web model, you will load it here and then use the interface to add and configure the HubNet Web elements.
Below those two primary options, there are two additional buttons for loading HubNet Web models created with an older alpha version of the tool, before NetLogo 7 support was added:
Edit a HubNet Web bundle (.hnw.json): For older HubNet Web activities saved as a single-file .hnw.json bundle.
Edit a HubNet Web model and config (.nlogo and .json): For older HubNet Web activities saved as a separate .nlogo model file paired with a .json configuration file.
I've reached the authoring interface, but I don't know how to use it. What do all of these options and buttons do?
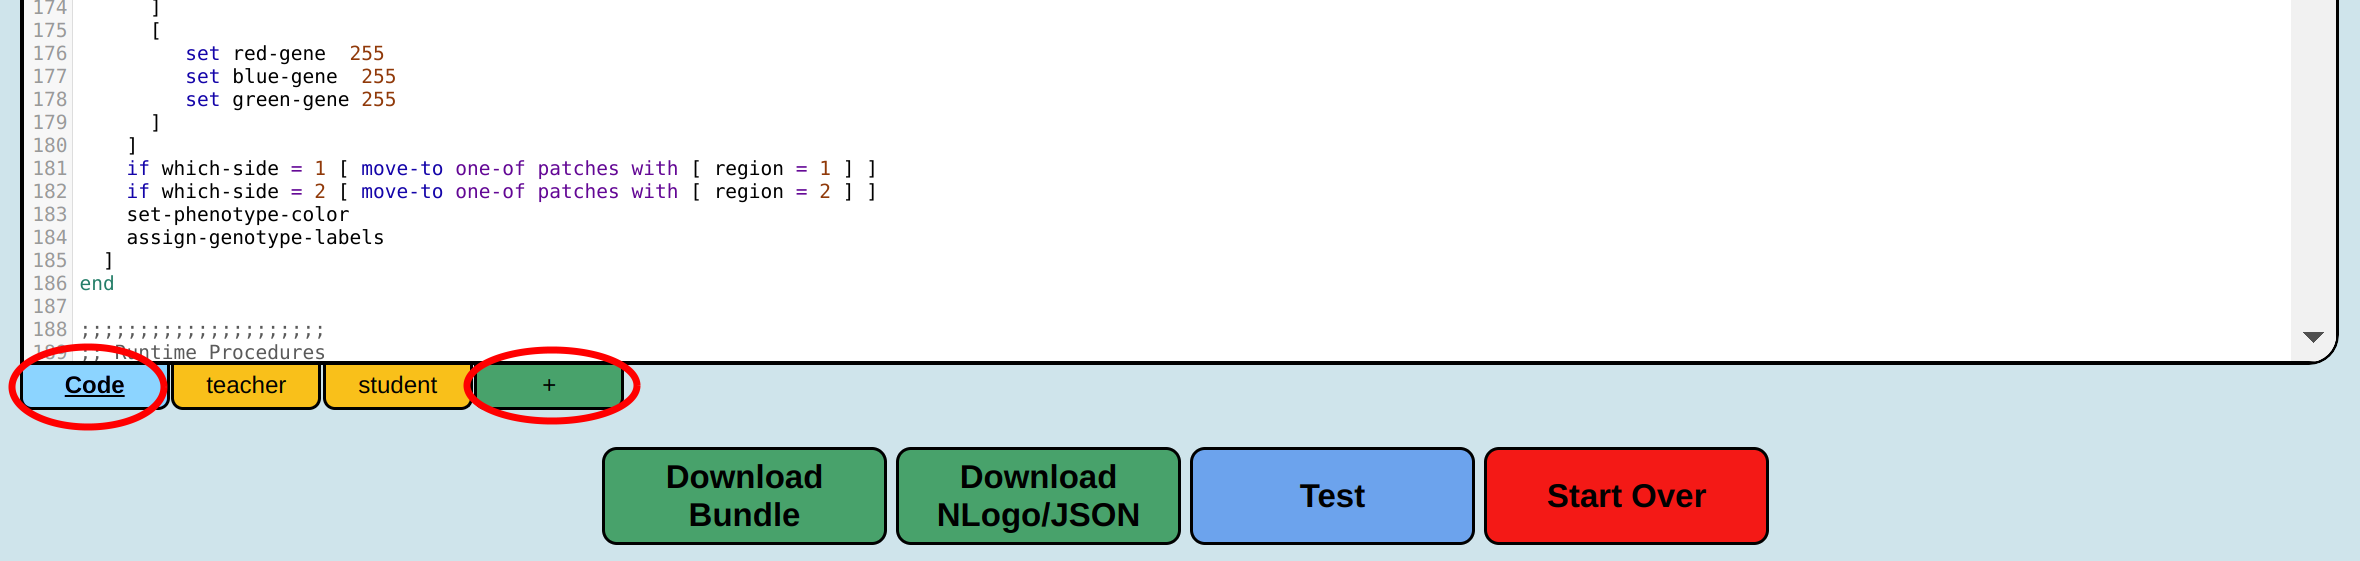
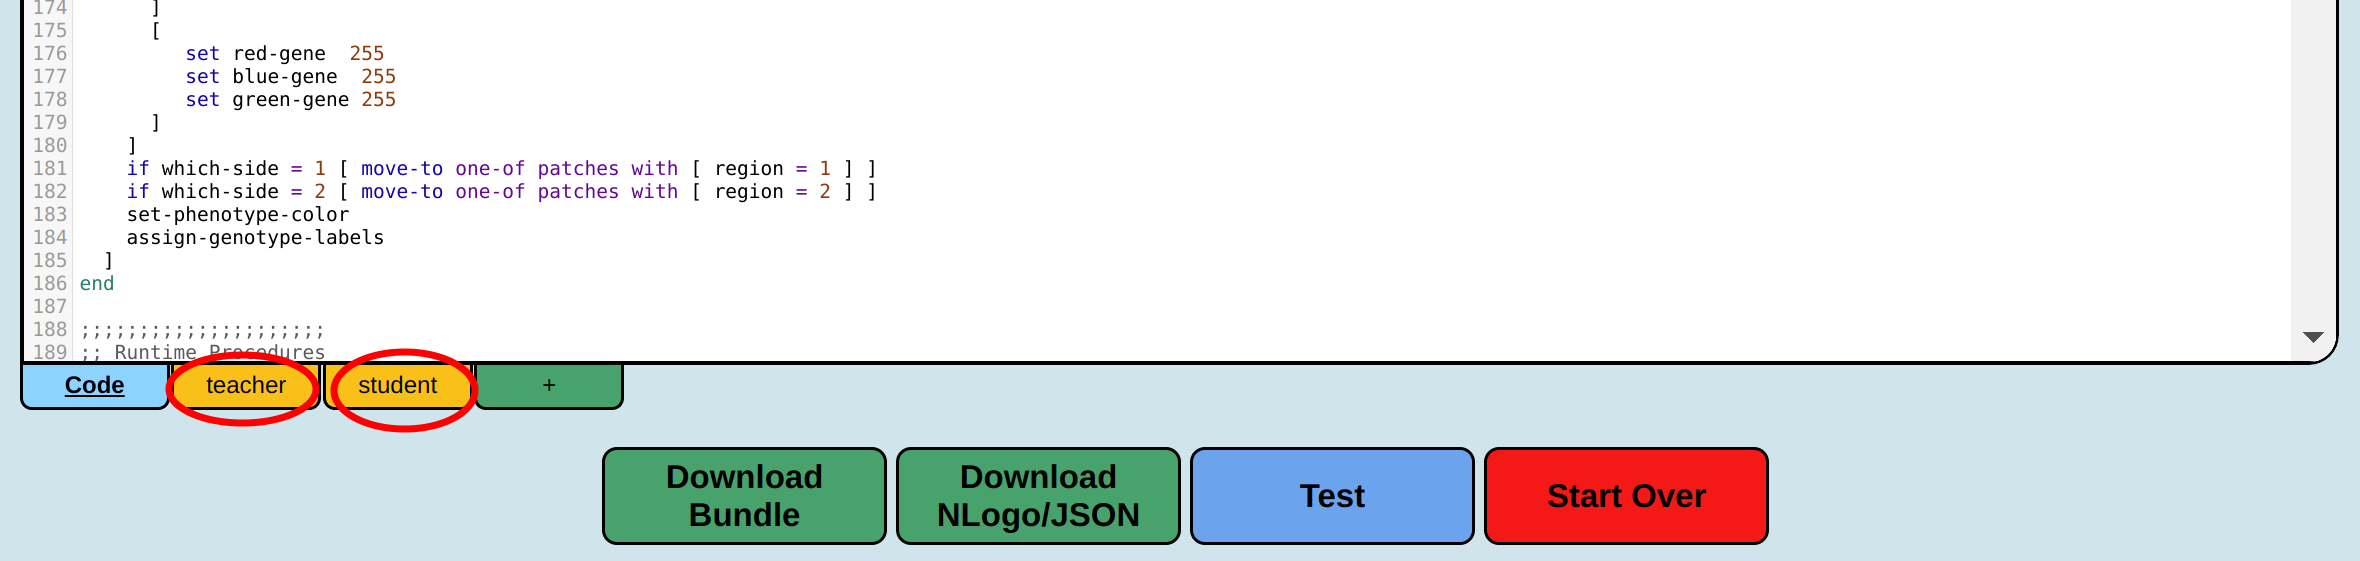
First, direct your attention to the tabs towards the bottom of the page. One reads "Code", while another reads "+". The "Code" tab pertains to the code for the entire HubNet activity. This code will be executed by the host of the activity, when buttons are clicked and users are taking actions. The tabs between "Code" and "+" define the roles in the activity. The "+" button allows you to add extra roles to the activity.
In traditional HubNet activities, there is only the "teacher" role (which exactly one user occupies) and the "student" role (which a variable number of users can occupy). In HubNet Web, most activities follow a similar trend, having just two roles, usually referred to as "supervisor" and "student" (sometimes: "player"). However, HubNet Web is not rigidly restricted to that formula like the original HubNet was. In HubNet Web, you can have just one role, or dozens of roles, or anything inbetween. As the author of a HubNet Web model, you can define all of the roles, their properties, and their membership limits.
What is the execution model of a HubNet Web activity?
Whoever launches an activity will be that activity's host, and all NetLogo code in the activity is run on the host's device. The client page that is used for connecting to the host's activity is mostly a "thin client". Most NetLogo models follow the idiom of having a "setup" button that initializes a fresh run of the simulation, and a "go" button that runs repeatedly to advance the state of the simulation. These procedures, like all other procedures, are run purely on the host's device, with the consequent updates being forwarded to all clients as new model states are produced.
Many traditional HubNet activities also supplemented "setup" and "go" with a "listen-clients" button, which would poll a queue for new messages, and then process those messages. However, in HubNet Web, there is no "listen-clients" or explicit message queue. Instead, user activity generates events, and those events are promptly reacted to by event handler procedures. When you build the configuration for a role in your model, you will specify things like "when a new user in this role connects to the activity, run this procedure (to setup their turtle for them)". This is done by selecting the name of the relevant Code tab procedure from a dropdown.
Similarly, there is no explicit message-handling of updates to client widgets (like Sliders). Instead, when you add a Switch widget to the interface for a role, you select from a dropdown which global or (more commonly) breed-based variable the Switch widget should be bound to. If every user in your activity is given control of a wolf agent, and all wolves in your activity own a show-name? variable, then you can add a Switch widget to the Wolf role's interface, and link the Switch to show-name?, so that changes the variable automatically update the remote widget, and changes to the widget automatically update the wolf's variable.
Roles are each linked to a breed in the model. Similarly, Button widgets and Plot widgets simply run procedures, as if wrapped up like ask my-agent [ button-handler ]. Ultimately, widgets get bound to procedures and variables that are defined in the Code tab, and the code in the widgets usually runs inside the context of their breeded agent. You can think of each client as if they were a turtle.
There is a caveat to this. Some roles are spectator roles. This is most commonly for "supervisor"/"teacher" roles. These roles do not get linked to a breed. They usually do not get an agent created for them upon connecting to the activity. Their procedures do not run in the context of an agent; instead, they run in the context of the observer. Their widgets are not bound to breed variables; instead, they are bound to global variables, prefixed with __hnw_[role name]_ (for example, a Slider for the variable num-androids in the "supervisor" interface will be bound to a global variable listed in the Code tab as __hnw_supervisor_num-androids). When adding a new variable through the widget editor's "Add New Variable" feature, the correctly prefixed global will be inserted into the Code tab automatically. You need to be aware of this naming convention if you are adding new spectator-role variables by hand or when using those variables in the model's code in the Code tab. There are plans to improve this ugly implementation detail of HubNet Web in a future release.
One advantage of this dropdown-based approach is that it's just plain simpler and less error-prone to choose options from a dropdown than it is to write code. Another advantage of the approach is that there is no longer any need for the multitude of hubnet-* language primitives that existed in the traditional version of HubNet. Everything that those primitives accomplished is now handled by event listener procedures and automatically-linked variables.
Now that you understand the execution model, you will be ready to learn how to use the authoring tool.
What do the things in the "Code" tab do?
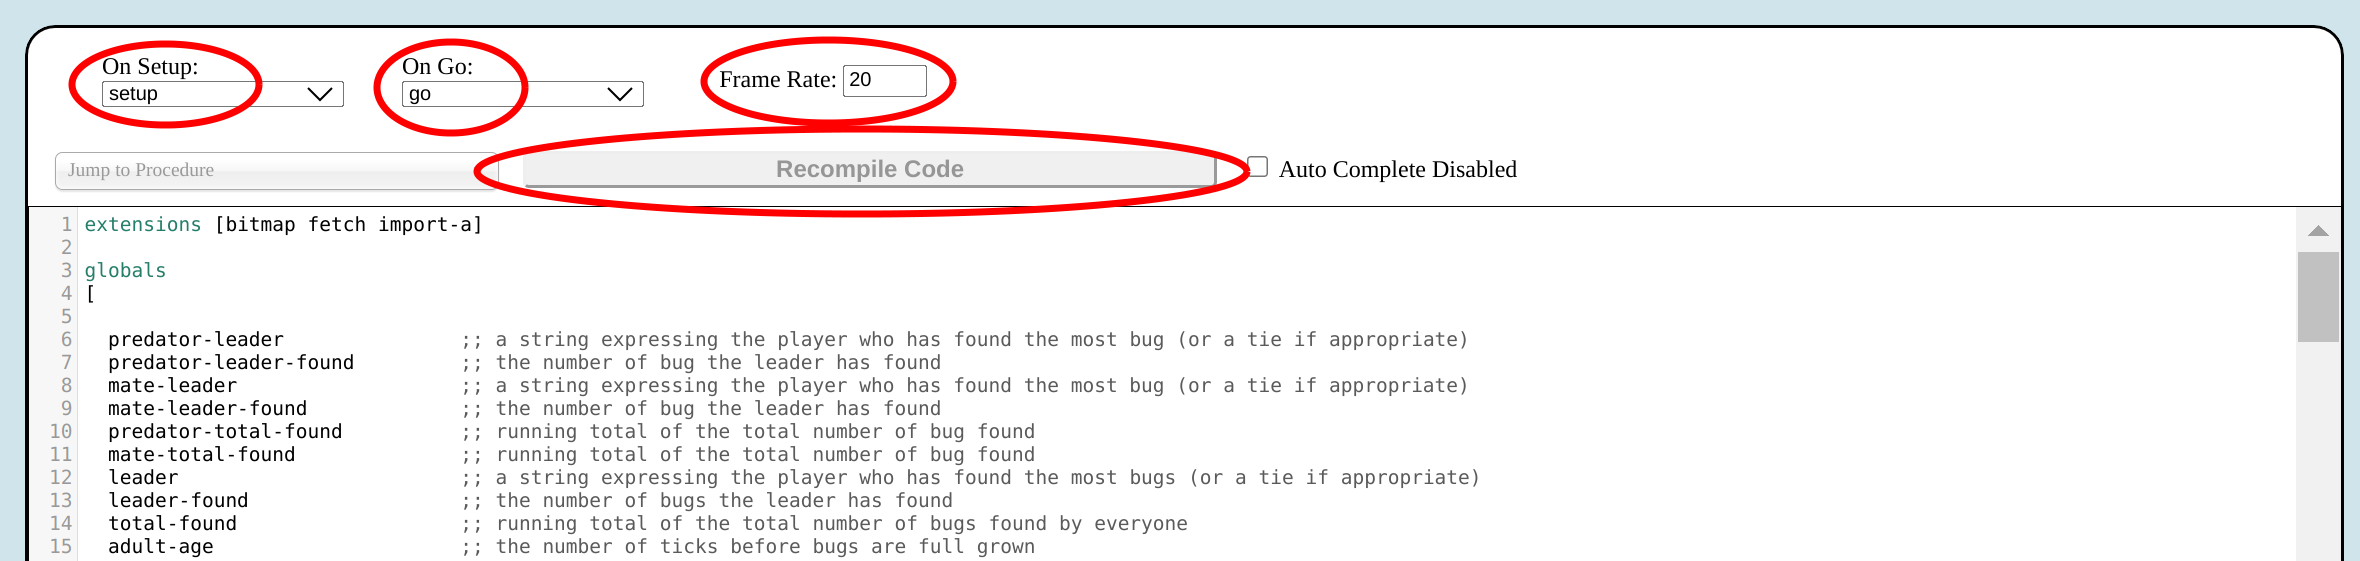
- On Setup: The procedure that will set up a fresh run of the model. Must be runnable from the observer context, return no value, and take no arguments. If this is left blank, no "setup" button will be generated for you in the user interface.
- On Go: The procedure that will run repeatedly to advance the state of the model. Must be runnable from the observer context, return no value, and take no arguments. Nearly all models have one of these.
- Frame rate: How many times per second you want the "On Go" procedure to run. Higher frame rates can produce smoother animations, but will also produce more-frequent model state updates, which can consume high amounts of bandwidth and cause your activity to become laggy to users. Setting this to "20" is often a good starting point.
Below those options, you will find the normal NetLogo Web code editor. Whenever you make changes to the contents of the editor, be sure to press the "Recompile Code" button to validate your changes.
I clicked into a role tab (such as the "student" tab). What do the options in the role tab do?
- Singular, Plural: These fields are read-only and are first set when a role is added to an activity. A role's name cannot be changed, but a new role can be created, and the author can re-create widgets and settings in the new role.
- Spectator Role?: If this checkbox is checked, the role will not be associated with a breed. Clients in a spectator role do not face the usual expectation to create (and be linked to) a new turtle upon connection. Linked procedures from this role's widgets will run in the observer context. Linked variables from this role's widgets must be linked to global variables in the Code tab, following the naming convention
__hnw_[role name]_[variable name]. This checkbox can be toggled on an existing role. A confirmation dialog will remind you that toggling it does not automatically add or remove the breed declaration in the Code tab — that must be done manually. - Delete Role: This button allows you to remove the role from the model altogether. Its associated breed, variables, and procedures will not be modified or removed.
- Can Join Mid-Run?: This currently does nothing, but may be used in future versions to delay allowing the entry of new clients while an activity is already running.
- On Connect: The name of the procedure to run when a user connects to the activity in this role. The procedure will be passed the user's display name as an argument (though, you are free to ignore this argument). You must, however, create a turtle for the user (if this role is not a spectator role), and report the
whonumber for the user's turtle. As such, this dropdown will only show reporter procedures that take 0 or 1 arguments and run in the observer context. - On Disconnect: The name of the procedure that will run when the user is disconnecting, but before their turtle has been killed. This procedure runs in the context of the user's turtle. This procedure is for a narrow set of circumstances when you need to use a turtle's variables to clean up data about the client before they fully disconnect. This dropdown only shows 0-argument command procedures that run in the turtle context. Note that this procedure does not run for spectator roles, since spectators are not associated with a turtle.
- After Disconnect: The name of the procedure that will run after the user has disconnected and their turtle has been killed off. This dropdown only shows 0- and 1-argument command procedures that run in the observer context. For non-spectator roles, the argument passed in will be the
whonumber of the now-deceased turtle. For spectator roles, no turtle exists, so the procedure is called with no arguments. - Max Count: The maximum number of users who may be simultaneously signed in with this role
- On Click: The procedure to be run when the View widget is clicked by a client of this role. The procedure will be passed the X and Y coordinates of the click. For non-spectator roles, it runs in the context of the bound turtle agent; for spectator roles, it runs in the observer context. This dropdown only shows 2-argument command procedures that run in the observer or turtle context.
- On Cursor Up: The procedure to be run when a View widget click is released by a client of this role. This is usually only relevant to models with drag-and-drop behavior. The procedure will be passed the X and Y coordinates of the click. For non-spectator roles, it runs in the context of the bound turtle agent; for spectator roles, it runs in the observer context. This dropdown only shows 2-argument command procedures that run in the observer or turtle context.
- On Cursor Move: The procedure to be run when the mouse cursor is moved within the View widget. The procedure will be passed the X and Y coordinates of the cursor. For non-spectator roles, it runs in the context of the bound turtle agent; for spectator roles, it runs in the observer context. This dropdown only shows 2-argument command procedures that run in the observer or turtle context.
- Perspective Var: The list variable that will be updated with any perspective information for a given client in this role (see below). This must be a breed variable for non-spectator roles, and a prefixed global variable otherwise.
- View Override Var: The list variable that will be updated with any view override information for a given client in this role (see below). This must be a breed variable for non-spectator roles. This option is not available for spectator roles and is hidden when the Spectator Role? checkbox is checked.
- Highlight Color: The color to use for the circle that appears around the user's assigned turtle
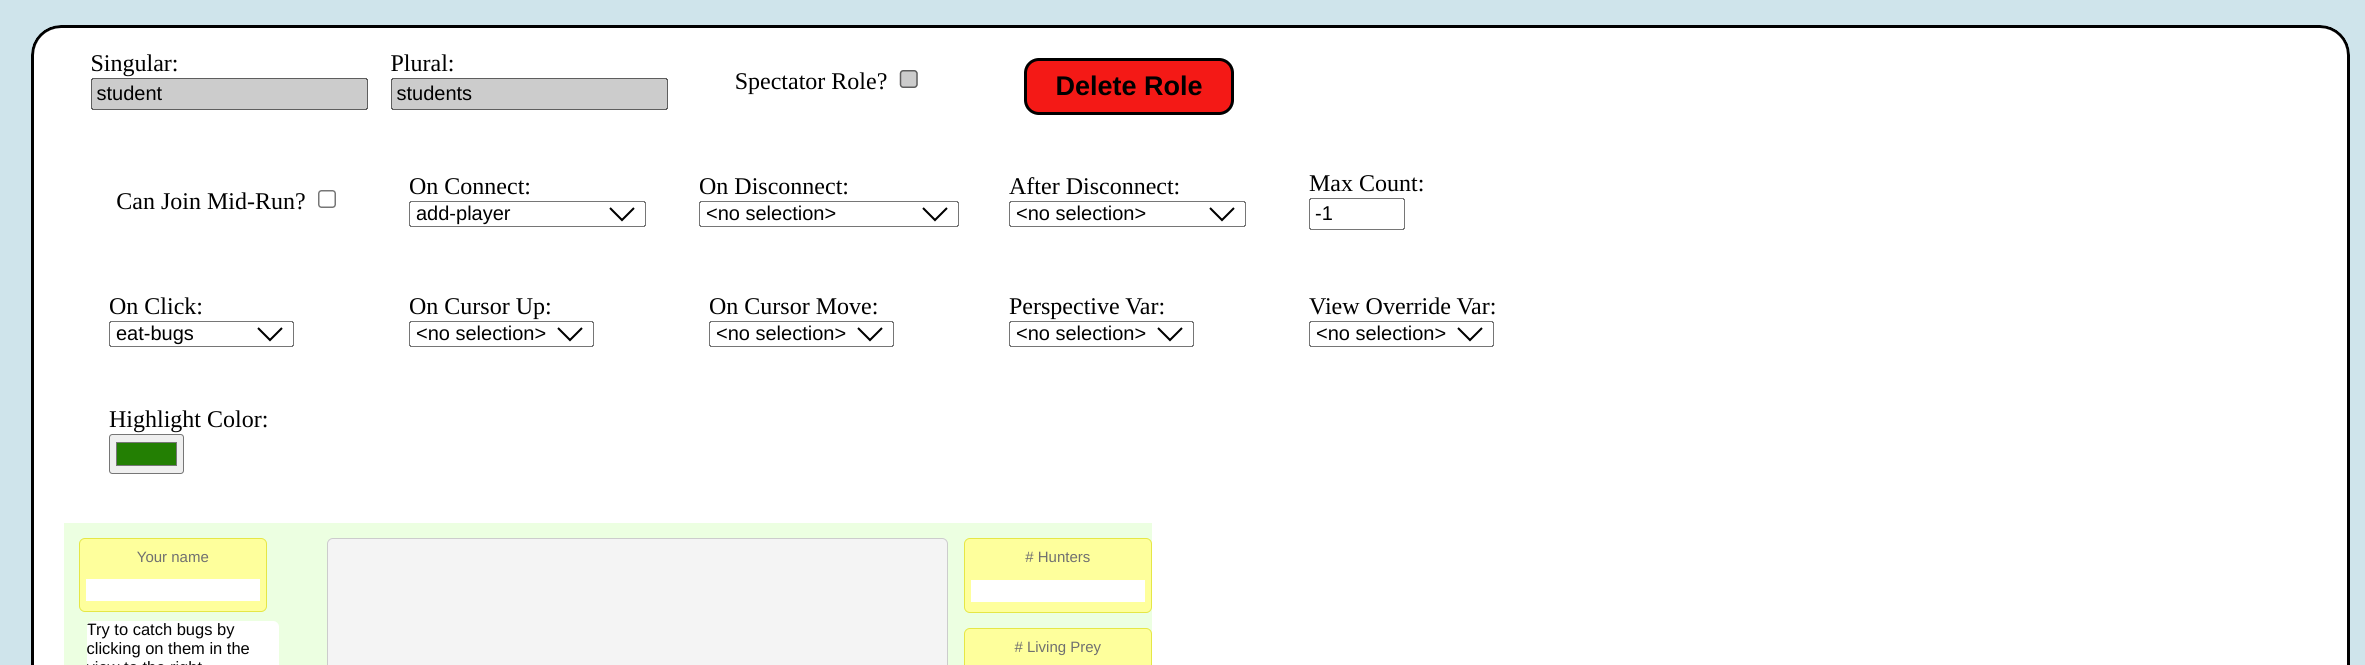
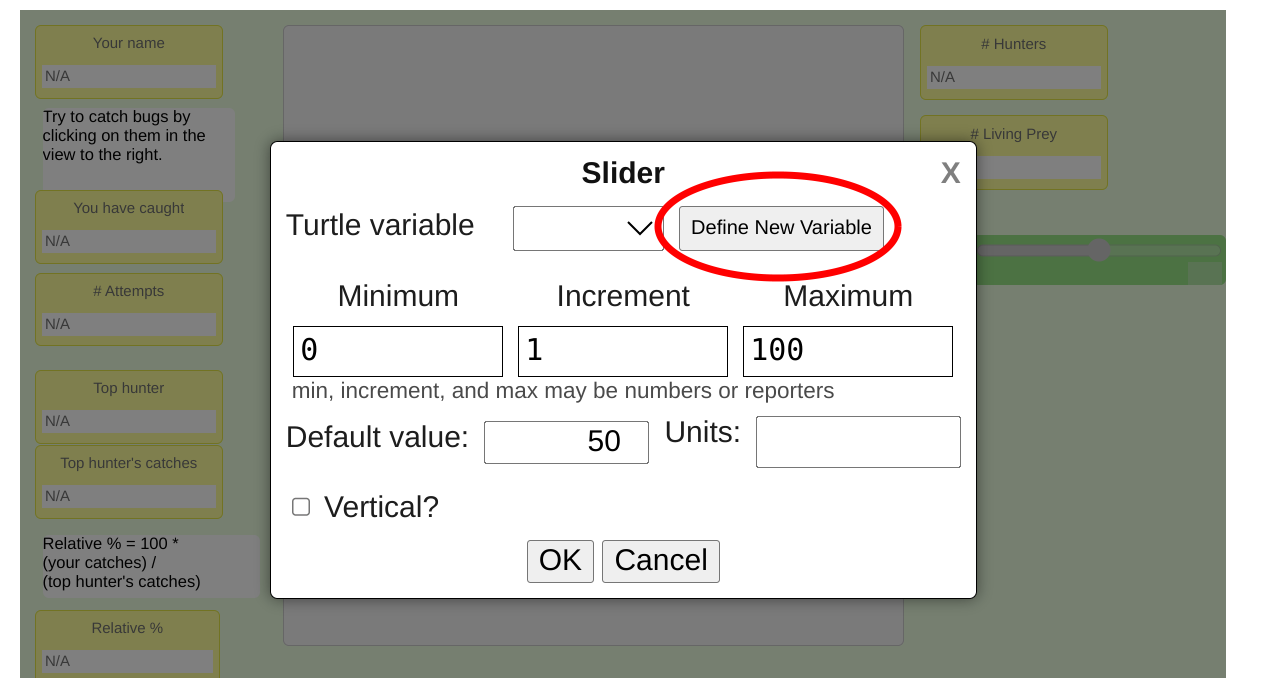
Below those inputs, you will see the standard NetLogo Web WYSIWYG widget editor. The gray box is the View widget, which can be repositioned and resized. To add a widget, right-click the green area and select the type of widget from the context menu. Then, fill in its properties and click "OK". All variable-bound widgets (Sliders, Switches, Inputs, and Choosers) offer you the option to define a new variable instead of selecting an existing one. The variable will then be automatically added in the relevant place in the Code tab.
What "shapes" of variables and procedures are supposed to be linked to each type of widget?
- Button: Zero-argument procedure that reports no value
- Chooser: Variable of any type
- Input: String/number variable
- Monitor: Any type of global or breed variable or zero-argument reporter
- Plot: For both plots and pens, all setup and update procedures must take zero-arguments and report no value
- Label: N/A
- Output: N/A
- Slider: Numeric variable
- Switch:
true/falsevariable
__hnw_ prefix described above, and linked procedures must be runnable as the observer. If your role is not a spectator role, linked variables must be included in your role's breed's owned variables, and procedures must be runnable in the turtle context.
I'm trying to link an event to a particular procedure, but I don't see it in the dropdown list. Where is it?
First, be sure that the Code tab is compiling. If your code won't compile, any changes to your list of procedures cannot be propagated to the widget editor.
Next, if your code is compiling and the procedure still isn't showing up, the problem is most likely that your procedure does not fit the expected "shape" for that event handler. Procedures will not show up in the list of event handlers if, for example, the handler needs a reporter, and your procedure is a command. Another way in which your procedure might fail to meet the "shape" is having too many arguments, or not taking enough arguments. Lastly, a procedure can have the wrong "shape" by being, for example, a procedure that only runs in the observer context, when a turtle-context procedure is needed. Please see the previous sections of this page to verify the shape needed for each dropdown.
How do perspective variables work?
Perspective variables allow you to set client-specific perspectives, like using the watch/follow/ride primitives in NetLogo, but with each client having an individualized perspective target (for example, a model where everyone follows the agent that was created for them when they connected to the activity).
In order to achieve this, you must assign a perspective variable to the role. When you assign a perspective variable, HubNet Web will watch it for changes, and pass on the necessary information to the client to update their perspective. The perspective variable must be two- or three-item list, of the following form:
"follow"or"watch"- The agent to focus in the perspective
- The numeric radius at which to follow (not used if the first item is
"watch")
See the "Client Perspective Example" model for example code.
How do view overrides variables work?
Override variables allow you to set client-specific changes to what is shown in the View widget.
As a simple example of this, we might have a button in our model that users can click to toggle a label beneath each turtle, showing its amount of energy remaining. We want the user to be able to control this for themself, without forcing everyone else to have the same label show up on their screen.
Another example of this is something like the "fog of war" feature in many strategy games, making it so that different participants are only able to see things in their vicinity, without global knowledge of the world. To achieve this sort of thing in HubNet Web, you can set all of the information to be hidden or obscured, and then send each client some overrides with the true information about the agents near them.
To leverage this functionality in HubNet Web, you need to assign an overrides variable to the role. This variable must take the form of a list. As your model runs and generates overrides, you should append them to this list variable. It is recommended that you never modify or remove items already in this list; this list should only be appended to. As HubNet Web executes the model, it will check the variable, build and send the necessary override messages to the specific client who owns the variable, and then clear the contents of the list for you.
Valid override entries come in a few forms:
[agents key function]: This three-item list indicates that the display variable with the name given bykeymust be set for all agents in theagentsvalue.agentsmust be either a single agent or an agentset. The override value for each agent will be determined by iterating throughagentsand running the mapping function (function) with the agent as the one and only argument to the function.- For example,
(list agents "color" [-> green])designates an override that will display each agent's color as green, regardless of what its actualcolorvariable says it is. - As another example,
(list agents "size" [t -> ([size] of t) * 5])designates an override that will display each agent as five times larger than it normally would be.
- For example,
["reset" agents key]: This three-item list indicates that the display variable with the name given bykeymust be reset for all agents in theagentsvalue.agentsmust be either a single agent or an agentset.- For example,
(list "reset" agents "color")designates an override that will revert to showing each agent's proper color.
- For example,
"reset-all": This simple string will revert all overrides on all agents up until the point when this value was added to the list of overrides.
See the "Client Overrides Example" model for example code.
I think I'm done editing my activity. How can I test it?
Go to the bottom of the page, where the save buttons are, and click "Test". This will launch a copy of your model on the global HubNet Web session listing. Anyone can join your activity when it is launched like this, so be sure to password-protect your room if you don't want unexpected visitors. Once you are done testing your model, you can click "Edit Model" to return to the authoring interface.
I think I'm done with editing my activity. How can I save and/or quit?
HubNet Web files are not automatically saved remotely anywhere. If you want your work to persist beyond the end of your authoring session, you must scroll to the bottom of the page and click "Download NLogox". This saves your entire activity — model code, widget layout, and HubNet Web configuration — as a single .nlogox file.
Once you have your work saved and you are ready to exit the authoring tool, you can select "Start Over" at the bottom of the page, which will bring you back to the root of the authoring interface.
I found a bug! Where can I report it?
Please e-mail us here with a description of what you did to cause the bug, what you expected to happen when you did it, and what unfortunate thing happened instead.